Staying in nice RV parks is always a lot of fun, but after our big road trip last Xmas, we hope to do a lot more boondocking in the near future. So, we’re going to level up our whole power generation and storage setup in the coming months.
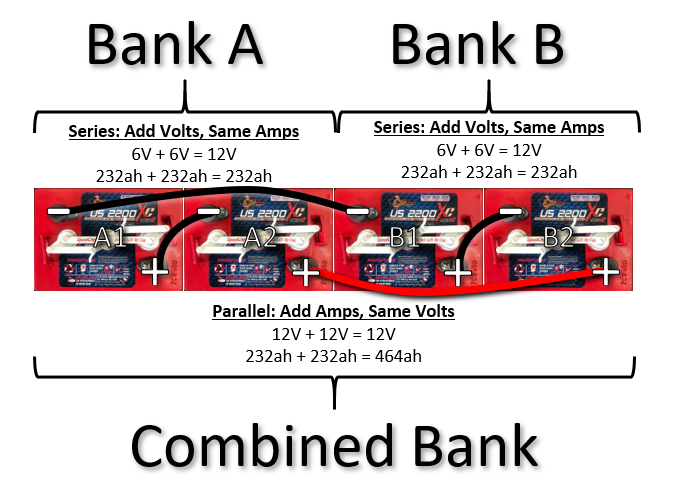
The first step for us is the battery bank and storage box upgrade. We have already upgraded from one 12V/100ah deep cycle marine (Interstate) battery to two U.S. Battery 6V/232ah golf cart batteries last year. We barely used them outside of 2 boondocking trips, so we got two more of those to tie together to double the size of our battery bank to 464ah (232ah usable).
In addition, we also installed the TorkLift PowerArmor Locking Battery Box. The reason for this upgrade is two-fold: 1) to enable us to stick all 4 6V batteries onto the tongue of our trailer, and 2) to secure those batteries inside a lock box for when we leave our trailer behind to go explore remote areas.

The battery box was installed first and it is super easy to do. We laid it out and marked the holes. Used the included self-tapping screws to secure the box directly to the frame of the RV behind the propane tanks.

Next, dropped the batteries into the Torklift box, and strapped them down using the included straps.

After that, we wired up the new battery bank in a series-parallel configuration. Each pair of 6V batteries was wired in series by connecting the positive post from one to the negative post for the other to create one large 12V, 232ah battery from the pair.

Then, the two pairs of batteries are then tied together in parallel by connecting the positives from each 12V cell together and then connecting the negatives together. Finally, we connected the main house power onto the positive and negative terminals of the entire battery bank.


They have the batteries on Amazon, but with the shipping costs, you’re better off finding them at your local Battery Systems or some such. Just check them out on the link so you make sure you’re getting the right ones. In addition to those and the battery box, you’ll need a few other supplies to get the job done. This includes:
- 1/0 wire (to connect batteries)
- Copper battery cable lugs (to connect the wires to the battery terminals)
- Battery cable lug crimpers (to secure lugs to wires)
- Heat shrink tubing (to clean up crimped lugs once installed)
- Heat gun (to shrink tubing around lugs)
- Longer positive cable (to attach batteries to trailer)
- Socket adapter (to attach battery box to frame)
Really looking forward to doubling our energy capacity for boondocking! Step 2 will involve mounting 600W of monocrystalline solar to the roof and connecting that through to a Victron 50A MPPT Charge Controller. We’ll also running a smart charger and the shore power through a pre-wired transfer switch and installing a 2000W inverter so that our internal 110 stuff works off the batteries. Stay tuned for that!
Don’t forget to check out the video with all the installation details! We’ll see you guys on the next adventure!
As an Amazon Associate we earn from qualifying purchases, which means we receive a small commission from sales of certain items, but the price is the same for you!
